Turning down the noise on your server’s logs with Fail2Ban

Access Denied!

If you’re running services exposed to the public internet, you’ll obviously need a way to remotely administer the machine. By far, the most common method is SSH, typically via OpenSSH. It is used on the vast majority of BSD and Linux systems.

One of the best improvements you can make to your SSH security model is to simply disallow password authentication entirely. A password can be guessed, leaked, or brute-forced. While an SSH private key could also be leaked or stolen, it is still widely considered to be the more secure and preferred option.

That said, there are situations where you may want or need to allow login from arbitrary machines. In those cases, requiring a private key may not be practical, since you would need to carry it with you everywhere, which isn’t always possible or convenient.

Basic SSH Hardening

First things first: do not allow anyone to log in as root using a password.

Really, you should not allow root login over SSH at all. But if you must allow it, then ensure it is key-only authentication.

If your server is exposed to the public internet, and especially if it listens on the default port 22, you can absolutely expect it to be hammered by bots and automated attacks. These will attempt logins constantly, probing for weak credentials.

They will also crawl your web services, checking endpoints and attempting to fingerprint your system. From that fingerprint, they can infer what vulnerabilities might apply. This is not hypothetical — expect hundreds or thousands of attempts per day.

Enter Fail2Ban

This is where Fail2Ban comes in.

Fail2Ban monitors logs for suspicious activity and reacts automatically. You define patterns (for example, repeated failed SSH logins), and when those patterns are matched, Fail2Ban takes action.

The most common setup is simple:

If an IP fails to authenticate 3 times, ban it at the firewall level.

Fail2Ban does this by inserting firewall rules (via iptables, nftables, or UFW depending on your system). Once triggered, traffic from the offending IP is dropped immediately.

This drastically reduces the effectiveness of brute-force attacks. Instead of allowing unlimited guesses, attackers get cut off almost instantly and must switch IPs to continue.

More Advanced Uses

You can go further if you want.

For example:

  • Ban entire subnets instead of single IPs
  • Aggressively block repeat offenders
  • Target other services (nginx, mail, etc.)

You can even block large geographic regions if you map IP ranges, though that requires more care and maintenance.

Whitelisting (Very Important)

The opposite is also possible — and recommended.

If you have a static IP at home, work, or another server, you should whitelist it. This ensures you never accidentally lock yourself out.

Even if you are using key-based authentication, having a whitelist adds an extra layer of safety and peace of mind.

Debian Setup (Minimal and Clean)

Install Fail2Ban:

sudo apt update
sudo apt install -y fail2ban

Create a local configuration file (do not edit defaults):

sudo nano /etc/fail2ban/jail.local

Paste the following:

[DEFAULT]

# NEVER ban these IPs (add your own here)
ignoreip = 100.100.100.100 200.200.200.200

# Ban settings
bantime = -1
findtime = 10m
maxretry = 3

# Backend auto works fine on Debian
backend = auto

# Use nftables (modern Debian) or iptables fallback
banaction = ufw
#nftables-multiport

[sshd]

enabled = true
port = ssh
logpath = %(sshd_log)s


If you are NOT using UFW, use this instead (this will always work on Debian)

Enable and start the service:

sudo systemctl enable fail2ban
sudo systemctl restart fail2ban

If using UFW, make sure it is enabled and allows SSH:

sudo ufw allow ssh
sudo ufw enable

Verify everything is working:

sudo fail2ban-client status
sudo fail2ban-client status sshd

What this configuration does:

  • 3 failed SSH attempts results in a ban
  • Ban is permanent (bantime = -1)
  • Your IPs are never banned
  • Firewall rules are handled via UFW (or iptables if you chose that route)

Final Thoughts

Fail2Ban is not a silver bullet, but it is an extremely effective first line of defense. It turns constant background noise from the internet into something manageable and largely harmless.

Combined with disabling password authentication, using SSH keys, and disabling root login, you end up with a setup that is simple, clean, and very difficult to attack in practice.

FreeBSD 15: Creating an NFS share with a USB disk

Here is how I recently went through the process of setting up a Raspberry Pi 4 running FreeBSD 15 to share a 1 TB USB hard drive to my local network via NFS.

Before we get to this point you’ll need to download the Pi aarch64 sdcard image from freebsd.org. Decompress the image (xz –decompress) and write it to a micro sd card with dd or your favorite imaging tool.

Boot the pi up, change root’s password, make a normal user, add them to wheel.

ntpdate -u pool.ntp.org will set your clock, and then you can install pkg or update the system with freebsd-update fetch install.

Now, onto the main point of this… we’re going to wipe a USB HDD, format it with UFS2 and share it on our lan via nfs.

Beastie with Pi in hand

Step 1 Identify your USB disk

camcontrol devlist

Find your USB disk, e.g., /dev/da0. Be sure it is correct.


Step 2 Wipe and partition the USB disk

gpart destroy -F /dev/da0
gpart create -s gpt /dev/da0
gpart add -t freebsd-ufs /dev/da0

This creates /dev/da0p1.


Step 3 Format the partition as UFS

newfs -U /dev/da0p1

Optional label:

newfs -U -L datadisk /dev/da0p1


Step 4 Create a mount point and mount the disk

mkdir -p /export/data
mount /dev/da0p1 /export/data
df -h /export/data


Step 5 Make it mount automatically at boot

Edit /etc/fstab and add:

/dev/da0p1 /export/data ufs rw 2 2

Mounting without reboot:

mkdir -p /export/data
chown ben:ben /export/data     # Your name here!
mount /export/data


Step 6 Set up NFS exports

Edit /etc/exports and add:

/export/data -network 192.168.1.0 -mask 255.255.255.0 -maproot=root -alldirs


Step 7 Start NFS services

Enable at boot, run these commands:

sysrc rpcbind_enable=YES
sysrc nfs_server_enable=YES
sysrc mountd_enable=YES

That will make changes to /etc/rc.conf for you! Now we run:

service rpcbind start
service mountd start
service nfsd start


Step 8 Verify the export

showmount -e

You should see:

/export/data 192.168.1.0


Step 9 Mount the NFS share your client PC

sudo mkdir -p /mnt/bsdpi
sudo chown ben:ben /mnt/bsdpi
sudo mount -t nfs bsdpi.lan:/export/data /mnt/bsdpi

Optionally you can put this in your fstab, probably want to do it in a way where it won’t keep your machine from booting if it isn’t online though!

Unreal Tournament 2004 now FREE! Linux support included!

UT2004

UT2004 is now free, easily installable on Linux Mac and Windows thanks to OldUnreal! This is even officially endorsed by Epic, so totally legit.

I just ran through the Linux install in less than 2 minutes. The download was very fast, no issues encountered.

You can use the install script here: https://raw.githubusercontent.com/OldUnreal/FullGameInstallers/master/Linux/install-ut2004.sh

Just mark it executable, and run with ./install-ut2004.sh -d /path/to/install (wherever you want)

UT99 (Game of the Year Edition aka GOTY), the original UnrealTournament is also available and has been for a little while.

https://github.com/OldUnreal/FullGameInstallers/tree/master/Linux

This is very exciting, and incredibly cool to see. I bought the Editor’s Choice box set back in the day and this was one of the first big box games I owned with native Linux support.

Writing a Better DD Wrapper GUI

Back in September last year, I was working on some kind of a wrapper for dd… Just for my own personal needs, nothing too fancy.

I got a little more ambitious, and was happy enough with the results to share it with anyone interested. Use at your own risk, of course.

What is it? It is a GUI front-end to dd. It is dependant on the GNU version of dd. Written in Python, uses QT toolkit.

GitHub: https://github.com/HarderLemonade/ddwrap/

Screenshot of DDWrap

Modernizing a Barracuda Backup Appliance: Upgrades, FreeBSD + ZFS

My Barracuda “Backup Server 290” Journey

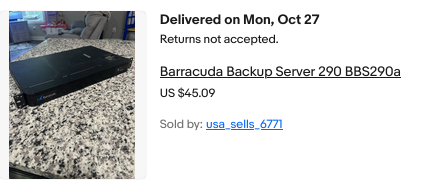
Back in October of last year, I got bit hard by the eBay bug. “Woah, that’s actually a pretty reasonable price… I’ll do SOMETHING with it!” — and just like that, I became the owner of a lightly used Barracuda “Backup Server 290.”

Barracuda 290 eBay listing

What is the BBS290, one might ask? Essentially, it’s a 1U rack-mount backup appliance. This one was running CentOS 7 with some custom interface stuff at both the VGA console as well as on a web server running on the box — basically a proprietary backup solution built from open-source software and a mix of consumer PC hardware, with some enterprise bits included.

I got mine for $40 USD, with the unusually low shipping price of $5. Shipping is usually the killer on these things; expect any 1U server to be listed with a shipping cost between $30 and $100.


What $45 Got Me

Honestly, not a bad little backup server. Funnily enough, that is exactly what I’m going to use it for: a target to back up my main server to.

As it arrived, it included:

• 1U Mini-ITX rackmount chassis
• 1U ATX power supply rated @ 400W, 80+ Bronze
• Western Digital enterprise-grade 2 TB 7,200 RPM SATA hard drive (Mfg 2022)
• Celeron N3150 on an OEM variant of the MSI N3150I ECO
• 1× 8GB DDR3 memory module

Not winning the lottery here, but with a few upgrades, this machine can fill a very real need in my setup. For this tier of hardware, I would not recommend paying more than $60–$70 total at the very most. That is up to you though. The platform (CPU, DDR3) isn’t worth a whole lot, and performance is underwhelming at best… but it is sufficient for what I wanted to do.

Low power draw, low heat, and the case and power supply are probably the best part of the “deal.”

The lightly used 2TB enterprise-grade drive was a nice bonus if you’ll actually use it for something. For instance, if 2TB was enough for your backup needs, then this box as-is is an excellent value. Most of us will want a bit more storage though.


Upgrades

  1. WD 8TB Enterprise Drive
    Replaced the original 2TB HDD. This is a CMR drive, 7,200 RPM — not SMR or 5,400 RPM (two big gotchas to look out for). I shucked it from an 8TB WD MyBook purchased locally for $150; it had only ~600 power-on hours. Shucking is far from foolproof, but I got very lucky to get a top-tier hard drive that had barely been used. It will live much longer being used in this server than in the fanless plastic heat trap it came in as a MyBook.
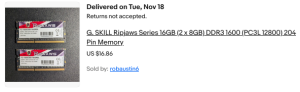
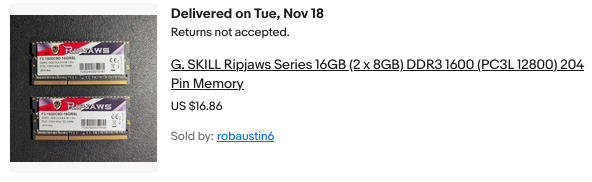
  2. G.Skill 8GB DDR3L RAM ×2 (16GB total)
    Helps with ZFS caching. Cost: $16.86. A basic setup could run with 8GB, but doubling helps ZFS performance. Additionally, using two memory modules allows the memory controller to operate in dual-channel mode, effectively doubling memory bandwidth. On an anemic CPU like the N3150, this can make a surprisingly substantial difference for I/O, especially when ZFS is handling many small files or metadata-heavy operations.
    16 GB RAM Kit
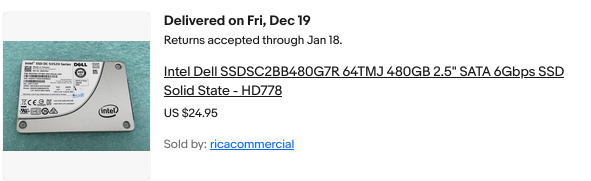
  3. Intel 480GB SATA SSD
    Data center–grade SSD costing about $25 on eBay. It allows the OS and root filesystem to live off the spinning disk and can also be used to accelerate ZFS performance via a special vdev for small file storage. You don’t need to do this if your data is mostly large files, media, or ISOs — but for small files, the performance boost is noticeable. If the special vdev disk dies, the pool dies — which is acceptable here, because this machine is strictly a backup target.
    Intel SSD
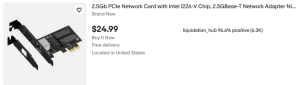
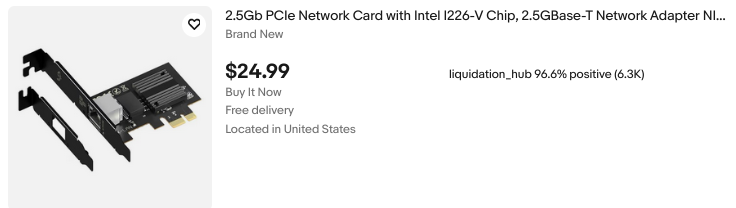
  4. Intel i226-V 2.5GbE NIC
    Cost: $30, combined with a PCIe x1 ribbon riser ($8.59) and some DIY shielding. This upgrade doubles network throughput over the onboard 1GbE Realtek NIC for very little money. Drivers are mature and stable on both BSD and Linux. For nighttime backups or casual use, the onboard NIC is fine; this is a small cost for a large convenience.
    Intel i226-V Network Interface

Total upgrade costs:

• RAM: $16.86
• SSD: $25
• NIC: $30
• PCIe riser: $8.59
• 8TB WD CMR HDD: $150

Grand total: $230.45 (including the original $45 for the machine itself)


Chassis and Cooling

The chassis originally had a lit Barracuda Networks logo and a cheap internal 40mm fan. I removed both and resprayed the case dark red for a fresher feel. The stock fan was noisy, and the PSU provides sufficient airflow, so I skipped adding a replacement.

I’ll keep an eye on temperatures. The CPU doesn’t require a fan at all. The 7,200 RPM disk gets slightly toasty, but it’s far better off here with airflow than in a MyBook enclosure with none.


OS Choice

I mostly run Linux, but I appreciate the technical merits of FreeBSD, especially for enterprise-grade storage and high-performance, low-latency applications. On FreeBSD, ZFS is a first-class citizen, unlike Linux where it’s often bolted on.

I initially experimented with XigmaNAS but wanted more control, so I went with FreeBSD 15.0-RELEASE.

Honestly, if you want to keep things simple, just go for XigmaNAS or TrueNAS Core. Both are solid FreeBSD-based storage appliance OSes which make ZFS much more approachable. Linux ZFS implementations like Ubuntu’s are fine, but FreeBSD is where it truly shines.


Installation

I wrote the 15.0-RELEASE image to a USB stick and booted it. Setup asks whether to install via Distribution Sets or Packages (Tech Preview); I used Distribution Sets.

• Disabled kernel debugging and lib32 support
• Selected the igc0 NIC (leaving re0 unused)
• Chose manual partitioning:
– 480GB SSD: MBR, 64GB partition for root / (UFS), SUJ off, TRIM on
– Swap: 2GB partition as freebsd-swap
– Remaining HDD space left unpartitioned for ZFS setup post-install

Enabled SSHD, NTPD, and powerd. Added a user in the wheel group. Other options left at defaults.


Post-Installation Storage Configuration

Check free space on the SSD:

gpart show ada0

This revealed ~383GB free for the ZFS special vdev:

gpart add -t freebsd -s 383G -a 4k
ada0

gpart create -s BSD ada0s2

Create the main pool on the 8TB HDD:

zpool create -f tank /dev/ada1

Add the special vdev on the SSD for small files:

zpool add tank special /dev/ada0s2
zfs set special_small_blocks=128K tank

Set mountpoint and ownership:

zfs set mountpoint=/mnt/tank tank
chown -R 1000:1000 /mnt/tank


Enabling and Setting Up NFS

Enable ZFS and NFS-related services:

sysrc zfs_enable="YES"
sysrc rpcbind_enable="YES"
sysrc nfs_server_enable="YES"
sysrc mountd_enable="YES"
sysrc rpc_lockd_enable="YES"
sysrc rpc_statd_enable="YES"

The zfs_enable=YES setting is important: without it, ZFS pools may not automatically import and mount at boot. This was the reason the pool initially failed to remount after a reboot.

Start services manually:

service rpcbind start
service mountd start
service nfsd start

Edit /etc/exports:

/mnt/tank -network 10.16.16.0 -mask
255.255.254.0 -alldirs -maproot=1000:1000

-network / -mask restricts access to your LAN
-alldirs allows mounting subdirectories
-maproot=1000:1000 maps all remote users to a local UID/GID

Apply the configuration:

service mountd restart
service nfsd restart

This method alone works reliably. Using zfs
set sharenfs
is unnecessary here and can introduce confusion.


Syncing Data via NFS

Mount the NFS share on the main server at /mnt/cuda, then ensure permissions:

chown -R 1000:1000 /mnt/tank
chmod -R 755 /mnt/tank

Run rsync:

rsync -avh --info=progress2 --modify-window=1 /mnt/sda1/ /mnt/cuda/

-a preserves timestamps, permissions, symlinks, etc.
--info=progress2 shows real-time progress
--modify-window=1 handles timestamp differences between Linux and FreeBSD

Observations:

• The SSD-backed special vdev noticeably improved small-file performance
• Dual-channel memory helped I/O on this low-power CPU
• The 2.5GbE NIC provides a large convenience boost
• Transfer speeds are currently limited by the source system’s storage and workload characteristics


Real-World Testing

Copying a 4.1GB Debian ISO from the Barracuda to my desktop completed in roughly 10 seconds. Both machines and the switch are 2.5GbE capable. Renaming the file and pushing it back (desktop → Barracuda) took about 15 seconds.

Htop reported 100–200 MB/s in both cases, though reads from the Barracuda are clearly faster than writes.

Pings between the two machines show excellent latency and consistency:

100 packets transmitted, 100 received, 0% packet loss
rtt min/avg/max/mdev = 0.103/0.114/0.175/0.009 ms


Closing Thoughts

For now, all my personal goals for this project have been met. Eventually, I plan to implement scheduled wake-on-LAN (or something conceptually similar) so the box only powers on when backups are needed. I don’t need it running 24/7 — it’s here to quietly snag incremental backups in case something goes wrong elsewhere.

For those new to FreeBSD, maintenance is fairly simple. Updates are handled with freebsd-update fetch install. After fetching, you’ll see a wall of text — press q, and the install will proceed.

That’s all for now.

Installing Debian onto Mirrored rootfs (Soft RAID 1)

SSD Mirror
Introduction

I’ve been in the process of upgrading my server… going all the way from the modest i5 7500T all the way up to a Ryzen 5 5500. Since I started acquiring the first couple items for the new build, I had the goal of booting this machine from a mirrored pair of SSDs… This way even if one had some kind of catastrophic failure, I can still boot from the second drive and replace the failed one when convenient. Now, I must state the obligatory “RAID IS NOT A BACKUP!”… If and when something gets screwed up, it will immediately screw up both copies instantaneously. So you’re really only protected from an actual disk failure. Frequent backups are still something one must do, to protect from all other scenarios.

So, why are we here?

Glad you asked! Some Linux distributions have evolved to be a bit more ‘helpful’ in scenarios like this… for example, while it isn’t as easy as it perhaps could be, Fedora had absolutely no problem doing what I wanted the first try. No fuss. It just worked.

Debian on the other hand… I’ll admit I re-installed 3 or 4 times. Once I realized the problem, it was obvious… But if you’re reading this, you’re probably wondering what the problem is!? Why won’t this junk work??

What worked for me

So, what we need to understand here are a couple of limitations. I’m not totally sure if they’re limits of EFI, grub, or debian’s specific configuration but none the less, this is what I’ve learned.

You can’t put the ESP/EFI partition on your linux mdraid. What you want to do instead is, slice up both your disks like normal… in my case, I did:

— 500 MB EFI
— 477 GB RAID PARTITION
— 2 GB RAID PARTITION

Do both disks exactly the same. The key here is, set up that first partition as a normal EFI partition… and do it on BOTH disks. Once both disks are sliced up, go into the Linux Software RAID option… Create an MD device. Pick your two devices for RAID 1… Firstly the large (in my case 477 GB) partitions… Then run through again, this time pairing up the smaller ones for SWAP. Finish the MD setup.

Back on the partitioner’s main screen, you’ll now see two additional devices above your physical disks. Double-click them… setting the first one up with ext4, xfs, whatever you’d like… and a mountpoint of / for rootfs. Next, do the swap.

In each disk, ensure that the ESP/EFI partition has the bootable flag checked and the EFI System partition type has been used (not RAID, fat32, etc).

Finish the install… it should go without a hitch. Now, we’re in pretty good shape here. Everything on this Debian system will be mirrored to both disks, meaning each write is simultaneously sent to each disk. One can die, and nothing will be lost, but we still need to resolve EFI. To get our second EFI partition populated, read on…

On the initial boot

Go ahead and run lsblk and see which disk you’ve booted from. It will likely be sda but could very-well also be sdb. Whichever disk we *did not* boot from, we want to mount that disk’s EFI partition.

Make a directory, /mnt/efi2 and mount that partition there… then copy everything from /boot/efi into the mirror disk’s EFI partition.

(as root)
mkdir -p /mnt/efi2
mount /dev/sdb1 /mnt/efi2
cp -a /boot/efi/* /mnt/efi2/

Now, we’ll also install grub to that disk…

grub-install /dev/sdb
update-grub

Reboot… And try booting into your other SSD. It should work!

FreeBSD 15.0 RELEASE has landed!

BeastieFreeBSD 15.0: Notable Improvements for Desktop and Laptop Users

FreeBSD 15.0 introduces a range of updates that strengthen the system’s usability on desktops, laptops, and general-purpose machines. Several areas that matter most to daily users—networking, graphics, and desktop environments—see meaningful development in this release.

A key update is expanded WiFi support. FreeBSD 15.0 adds drivers for Realtek’s rtw88 and rtw89 chipsets, used in many current laptops. Intel iwlwifi support has also been refined, and the installation media now includes a dedicated WiFi firmware package, making it easier for a wider range of wireless adapters to function immediately after installation.

Graphics hardware support also advances. By incorporating newer Linux DRM driver code, FreeBSD improves compatibility and performance on modern Intel and AMD GPUs. This benefits both X11 and Wayland sessions, with smoother acceleration and more consistent behavior across display setups.

Desktop environments gain from this foundation. KDE Plasma, GNOME, Xfce and others continue to be available through packages, and improved hardware support helps these environments run more reliably. Work on a more desktop-friendly installer is ongoing and aims to simplify initial setup in future releases.

The system as a whole also receives updates. Optimized libc routines bring performance improvements on amd64, and various device drivers—covering networking, audio, PCI, and storage—have been updated for better compatibility and stability.

Taken together, these changes make FreeBSD 15.0 a solid release for users running the system on everyday hardware, offering broader support and a smoother experience across a wide range of setups.

Grab it now!
https://download.freebsd.org/releases/amd64/amd64/ISO-IMAGES/15.0/

Devuan 6.0 “Excalibur” Released – Your Systemd-Free Debian 13 System

init freedom

Less than three months after the official release of Debian 13 “Trixie,” the Devuan project has officially launched Devuan 6.0 “Excalibur” on November 2nd, 2025.

Excalibur brings all the benefits of Debian 13’s updated packages, modern kernels, and long-term support while staying true to Devuan’s systemd-free philosophy. The release ensures that alternative init systems like sysvinit and runit integrate smoothly, and existing Devuan users can plan upgrades with confidence.

For the Devuan community, this release represents a stable, up-to-date option for both new installations and older hardware users who want the reliability of Debian without systemd. If you’ve been waiting to move to a fresh, modern, yet systemd-free environment, Excalibur is ready to download and install.

Announcment: https://dev1galaxy.org/viewtopic.php?id=7507

Learn more and download: https://www.devuan.org/os/releases

Firefox Scrolling Inverted??

First time this has happened to me, but running the FireFox Nightly (which came on NetBSD 11 BETA) I noticed my TrackPoint \ middle mouse scrolling was reversed. I think they might call this “natural scrolling”… anyway, to fix it simply go to about:config in the title bar and search for mousewheel.default.delta_multiplier_y — Change it from 100 to -100 and presto, normal scrolling behavior.

OpenBSD 7.8 Released Today, /w Pi 5 Hardware Support!

OpenBSD 7.8, is another careful step forward that strengthens daily usability across laptops, desktops, and ARM64 systems. While this release isn’t radically new, the OpenBSD team continues to refine and expand their legendary system in all the right places.

The most visible change is Raspberry Pi 5 support. OpenBSD now boots cleanly on the Pi 5 with working SDHC storage, Ethernet, and Wi-Fi power management through new RP1 and sdhc drivers. That takes the board from experimental to genuinely usable. Additional ARM64 updates improve clock, PWM, and RTC support on newer SoCs, broadening the list of hardware that “just works.”

Power management on laptops sees steady progress. AMD systems handle S0ix suspend and resume more reliably, and the amdgpu driver now sleeps and wakes properly under S3. Laptops with GPIO-based lid sensors can suspend and resume cleanly, and hibernation reliability improves with better pre-allocation during boot. Small changes, but together they make OpenBSD behave more predictably on modern notebooks.

Networking performance benefits from new multicore TCP and IPv6 input handling, allowing up to eight threads to process traffic in parallel. Several core system calls, such as close() and listen(), were unlocked from global network locks, reducing contention on multi-CPU systems.

Graphics support advances with a DRM update based on Linux 6.12.50, improving amdgpu reliability and adding Qualcomm display controller support. Xorg remains the standard display server, while Wayland continues to function through XWayland and wlroots compositors for those who prefer a modern stack. In ports, GNOME 46 and KDE Plasma 6 are available, keeping desktop environments current alongside updated Firefox and Chromium builds.

The built-in hypervisor gains AMD SEV-ES support for encrypted guests, and the installer adds further safeguards and clearer defaults. Security hardening continues quietly across the base system, with more software adopting pledge and unveil.

OpenBSD 7.8 doesn’t chase trends, but it delivers a more capable, consistent, and secure system across a wider range of hardware. Whether on a modern laptop or a Raspberry Pi 5, this release shows the project’s continued focus on quality and correctness—hallmarks that keep OpenBSD in a class of its own.

https://www.openbsd.org/78.html

© 2025 LostGeek.NET - All Rights Reserved. Powered by ClassicPress, NGINX, Debian GNU/Linux.