A minimalist video player, controlled over ssh

MPV Player

I quite often find that when I’m setting up something that I’m going to use myself, the extra layers are just annoying. Kodi/XBMC is great, but if you don’t care to set it up right it can feel clunky… to me anyway. That said, I do want some comforts in my solution.

No manually typing out long file names!
No cryptic, long commands

I give you btv, a wrapper I wrote for MPV. It is meant to be used over SSH.


Log in via SSH, change directory to the file(s) you want to play and type btv, it will list out the available video formats in that dir. Hit the corresponding number, press enter and it will start playing. It does so with nohup, so you can exit the ssh session or whatever — it’ll keep playing. If you run it again, while something is playing, it will pause for you. If you run it while something is open and paused, it resumes.

You can also manually set args with:
–stop
–pause
–resume
–play (filename)
–status

You’ll have to configure the correct audio/video outputs for your own setup. This is mine, on a pi5. If you have no audio, pulse/pipewire is probably the reason. Just stop the service(s).

Source available along with some of my other projects:

https://ben.lostgeek.net/code

The PiFrame — Pi Zero 2 LCD Weather Clock


The
          PiFrame

   Raspberry Pi Zero 2 WH — $18
I2C 20×4 LCD Display — $5
Shadowbox Frame — $7

Doing a geeky project for under $30?? Priceless…

Ah, the Raspberry Pi. That $35 single board computer everyone was scalping for 3x what they were worth during the chip shortages. Well, I used to own several of them… and unfortunately no longer do. I will say, for the MSRP price they aren’t a bad option. The whole ecosystem is quite attractive for many reasons, and the brand receives praise left and right for it. I will indeed say, they’re basically swiss army knives for a hacker. A whole miniature linux system, with a quad core 64 bit CPU and often 1 – 4 GB of RAM. IMO the 8 GB is a waste of money, of course, I tend to like lean configurations so perhaps I just feel that way because I’d never use 4 GB on a Pi let alone 8. AND, if I did need 8 GB or more, I’d use a DDR4 mini PC, not a Pi!

Anywho, in the spirit of what the Pi is all about, I wanted something cheap to hack on. I have a Pi 5, but it pulls full time duty as a server. And, what can I say? It works so well for this, and the small size and lower power requirements are part of that attraction for me. Now, PCIe gigabit ethernet, and PCIe NVME storage are a pretty strong motivation for my willingness to keep the Pi 5 4 GB I’ve got employed as a server. Without those, I’d use a thin client or old laptop in a heartbeat. Oh yeah, the spirit of the Pi, that’s where I started blabbing right?

So the Pi Zero, it’s like an original 2012 Pi, but with optional Wifi. You loose onboard ethernet (but it was USB anyway on the early models, and you do have a USB port to add a NIC…) but you get a very small package still boasting full 40 pin GPIO. They refreshed the Pi Zero in late 2021 with the Pi Zero 2. If you want WiFi and BT, you want the Zero 2 W. Want pre-soldered GPIO pins too? Get the WH.

** NOW a little PSA here, I bought a Pi Zero 2 WH on Amazon… so that came /w a soldered GPIO pin header. Quite handy, even has color coded spots at the base of each pin so you know what is GPIO, 5v, Ground, etc… Except, mine was put on upside down. Took me forever to figure this out, and I would have been pretty pissed if I needed to RMA it because some shoddy reseller is doing these headders themselves to save 30 cents and mislabeling the pins. I don’t care now that I know, but being largely for the education market this is a bit discouraging to see. If I were in the same situation as a young kid, the Pi may very well have gone in the bin.

You can get a pack of two 20 character / column x 4 row LCD screens, with pre-soldered i2c “backpack” for about ten bucks. And, you can get it in green, red, blue, whatever you want. I went with the OG, green LCD.

Let there
        be light!

So… what does it do? Well, it’s an excuse to have another Linux box in your fleet, I mean, what more do you want?? But since you asked, it does anything you tell it to. Right now, mine spends five seconds showing me the date, time, and my web server uptime. Then it shows me local weather for another five seconds. There’s more in the pipe though, and trying out new code is incredibly easy.

LCD
        Display LCD Display

What makes this clock… tick?? Python.

#!/usr/bin/env python

import drivers
from time import sleep, strftime
import argparse
import requests
import subprocess

def get_uptime():
    try:
        # Run the 'uptime -p' command and capture the output
        #result = subprocess.run(['uptime', '-p'], capture_output=True, text=True, check=True)
        result = subprocess.run(['cat', '/tmp/uptime'], capture_output=True, text=True, check=True)
        uptime_str = result.stdout.strip()  # E.g., "up 1 day, 1 hour, 45 minutes"
        
##        # Use awk to format it as "up 1d 1h 45m"
##        formatted_uptime = subprocess.run(
##           ['awk', '{print "WWW up ", $2 " weeks", $4 "d", $6 "h"}'], input=uptime_str, text=True, capture_output=True
##        ).stdout.strip()

## The above works, when you've had < 7 days up... then we need the following... (and yes, I could have made this MUCH more elegant)

        # Use awk to format and convert weeks into days, then calculate total days
        formatted_uptime = subprocess.run(
            ['awk', '{week_days=($2*7); total_days=week_days+$4; print "HTTPD.lan up", total_days "d", $6 "h"}'], 
            input=uptime_str, text=True, capture_output=True
        ).stdout.strip()
        return formatted_uptime

    except subprocess.CalledProcessError as e:
        print(f"Error getting uptime: {e}")
        return "Uptime not available"

# Load the driver
lcd = drivers.Lcd()

# Weather API settings
API_KEY = "000000000000000000000" ## The API keys are free, just sign up. Painless or I wouldn't have bothered.
ZIP_CODE = "00000" ## Your Zip code here!
COUNTRY_CODE = "US"
WEATHER_URL = f"http://api.openweathermap.org/data/2.5/weather?zip={ZIP_CODE},{COUNTRY_CODE}&appid={API_KEY}&units=imperial"

# Function to fetch weather data
def get_weather():
    try:
        response = requests.get(WEATHER_URL)
        data = response.json()
        if data and data["cod"] == 200:
            temp = round(data["main"]["temp"])
            humidity = data["main"]["humidity"]
            wind_speed = round(data["wind"]["speed"])
            wind_dir = data["wind"].get("deg", "N/A")
            return temp, humidity, wind_speed, wind_dir
    except Exception as e:
        print("Error fetching weather:", e)
    return None, None, None, None

# Parse command-line arguments
parser = argparse.ArgumentParser(description="LCD Display Script")
parser.add_argument("--wc", action="store_true", help="Only display weather and clock pages in rotation")
args = parser.parse_args()

try:
    while True:
        # Date/Time page
        lcd.lcd_clear()
        lcd.lcd_display_string(strftime("Today is %A,"), 1)
        lcd.lcd_display_string(strftime("     %B %d"), 2)

        # Display uptime on the 4th row
        uptime = get_uptime()  # Call the function and store the uptime
        lcd.lcd_display_string(f"{uptime}", 4)

        # Continuously update the time (third row)
        for _ in range(10):  # Display for ~10 seconds
            lcd.lcd_display_string(strftime("     %I:%M:%S %p"), 3)
            sleep(1)

        # Weather page
        if args.wc:  # Include weather in both modes (if --wc is passed)
            temp, humidity, wind_speed, wind_dir = get_weather()
            if temp is not None:
                lcd.lcd_clear()
                lcd.lcd_display_string("    Boscawen, NH    ", 1)
                lcd.lcd_display_string(f"    Temp: {temp}F   ", 2)
                lcd.lcd_display_string(f"   {humidity}% Humidity", 3)
                lcd.lcd_display_string(f"  Wind: {wind_speed}mph", 4)
                sleep(5)

except KeyboardInterrupt:
    print(" ~ Clearing ~ ")
    lcd.lcd_clear()

Now, I’m not really much of a programmer. Nope. But, ugly or not there it is. I suggest you do what I did, and start here: The Raspberry Pi Guy has a page with sample code and some other helpful stuff on Github. Using the 16×2 code on a 20×4 is as easy as changing 16 to 20 and 2 to 4. Well, gotta add lines 3 and 4 below 1 and 2. But not rocket surgery.

I recommend using the overlay FS and read only /boot partition if you do something like this to avoid accidental SD card filesystem corruption from unsafe shutdowns. I actually added a systemd service so that on target of reboot, halt or shutdown a shell script will kill the python process, then launch another which blanks the screen and replaces the text with “IT IS NOW SAFE TO TURN OFF YOUR COMPUTER” — if you know, you know. About 1 second after that hits the LCD, the Pi powers off and the Act LED goes dark. The LCD will stay lit, and retain the last thing printed on it as long as power is connected.

Now, the BEST thing to do for your filesystem / SD card is to power off via SSH before unplugging any Pi. However, to power my “clock” up, all I do is plug it in. If you put in your crontab a line starting with @reboot, you’ll be able to easily start scripts at boot. I did this as root, because I think you need to be root to use the GPIO. Probably a way around this, but this runs nothing other than the display stuff at the moment.

Cron on the Pi Zero 2 W. aka PiFrame:
@reboot /root/lcd/bens3.py –wc
@reboot curl -s https://ben.lostgeek.net/uptime.txt -o /tmp/uptime
0 * * * * curl -s https://ben.lostgeek.net/uptime.txt -o /tmp/uptime

What this does is at boot, we pull uptime from a text file on my webserver and we start up the python program with the –wc arg, “weather clock”. This applies to the code above, so I left it as is. Only one more part is needed.

Cron on the server:
0 * * * * uptime -p > /var/www/html/ben/uptime.txt

This puts an up to date uptime file in my web directory once an hour. And the keen observers among us probably noticed that the Zero also will refresh this information at the top of each hour too. Easy peasy.
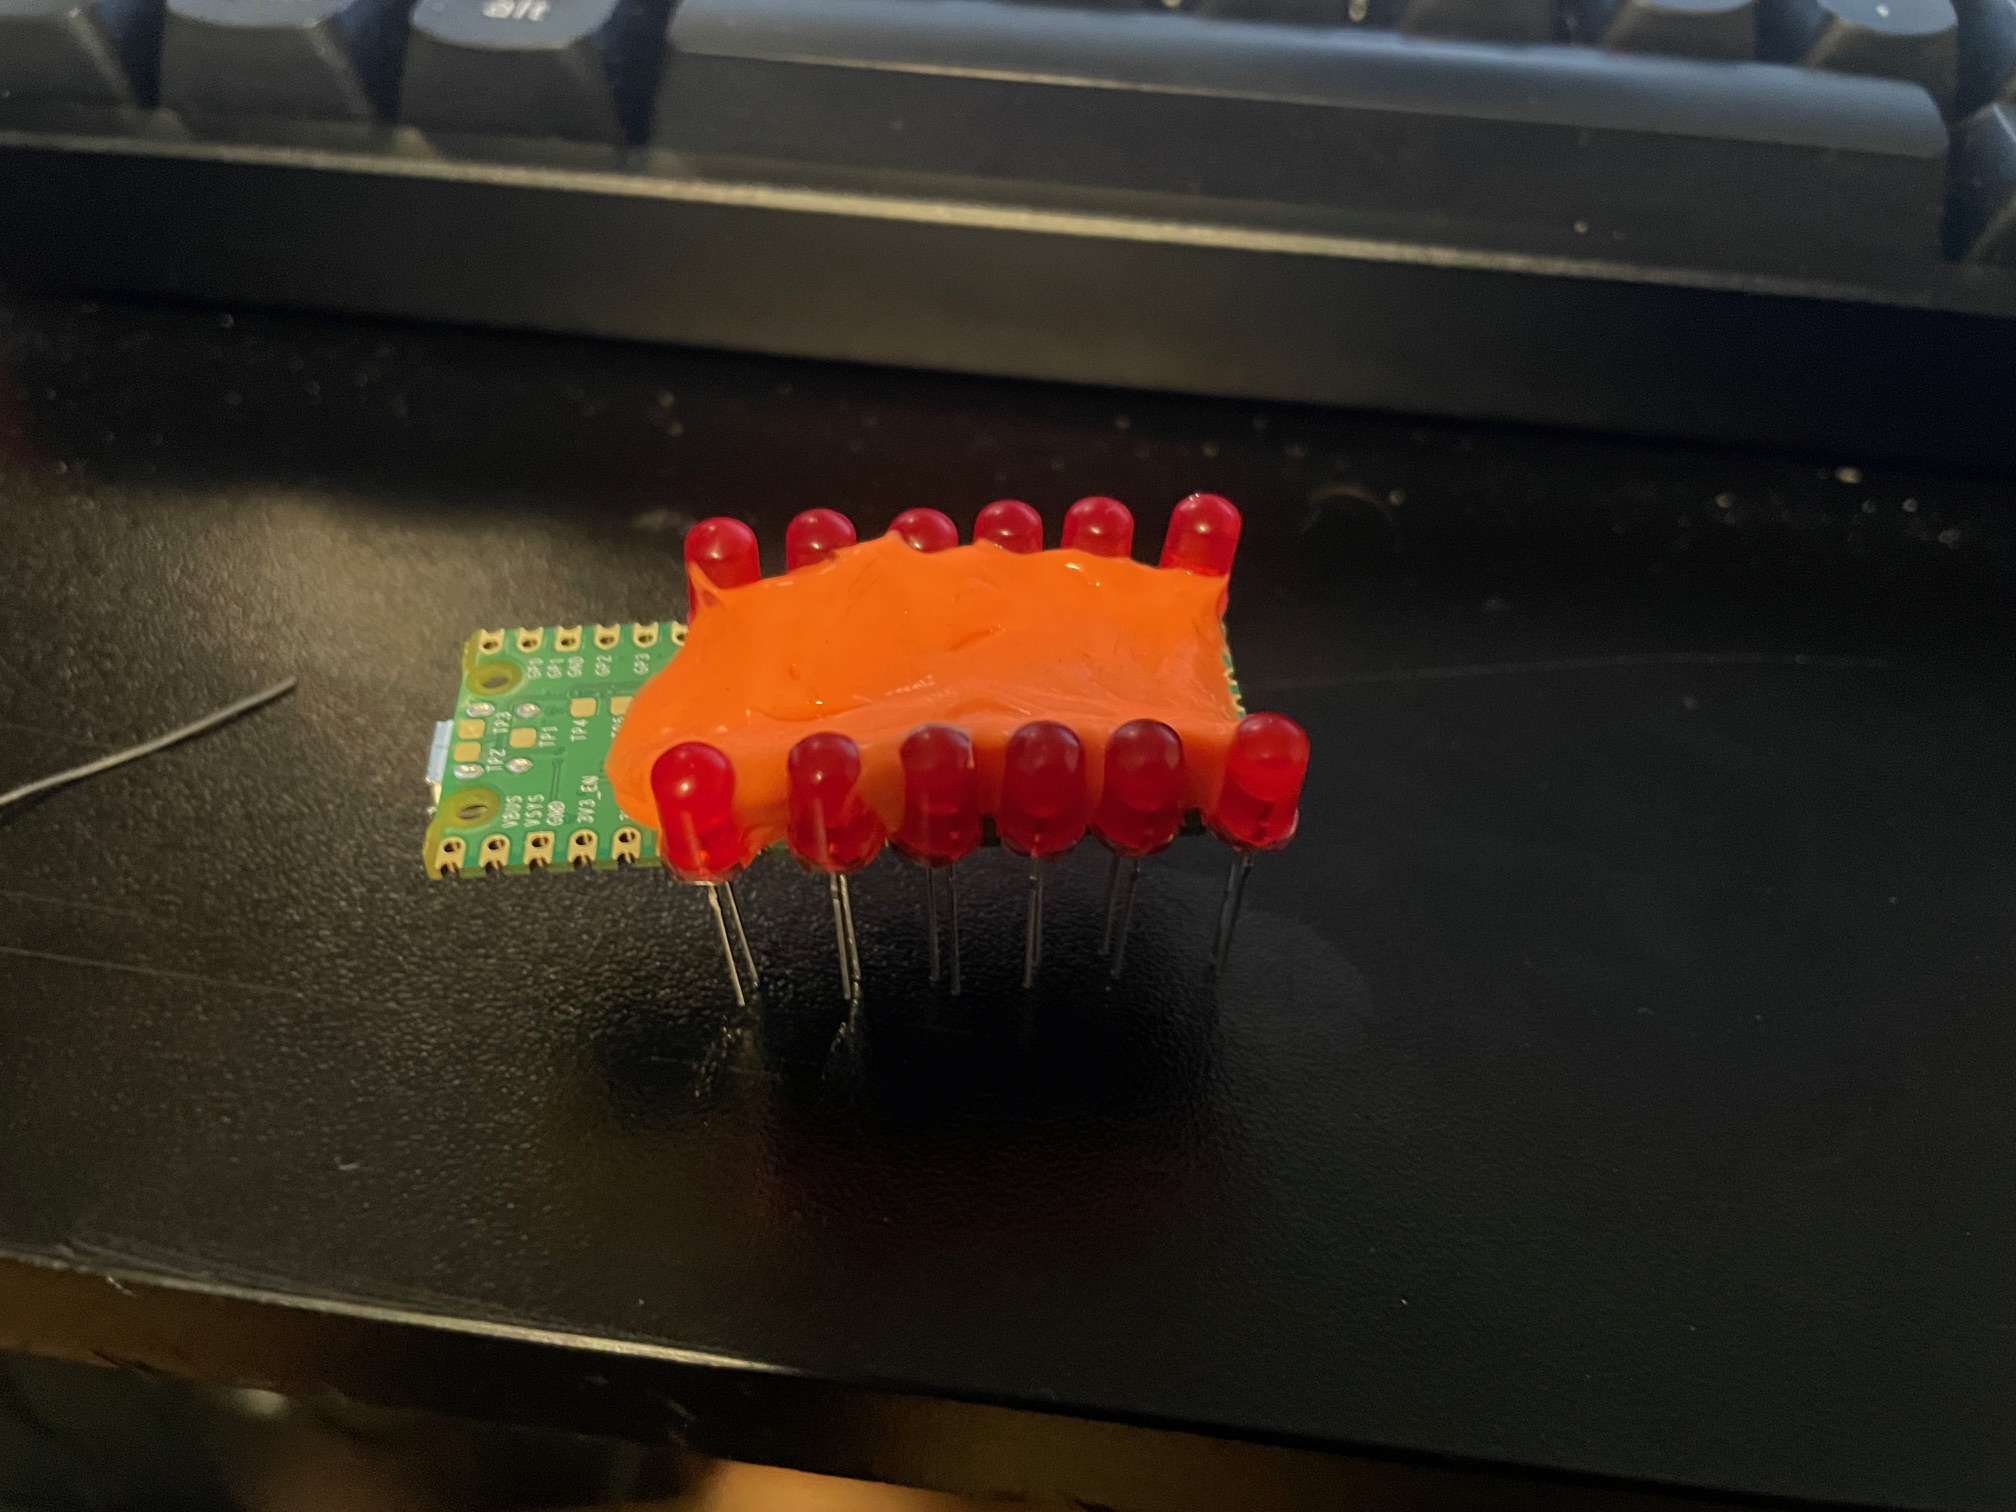
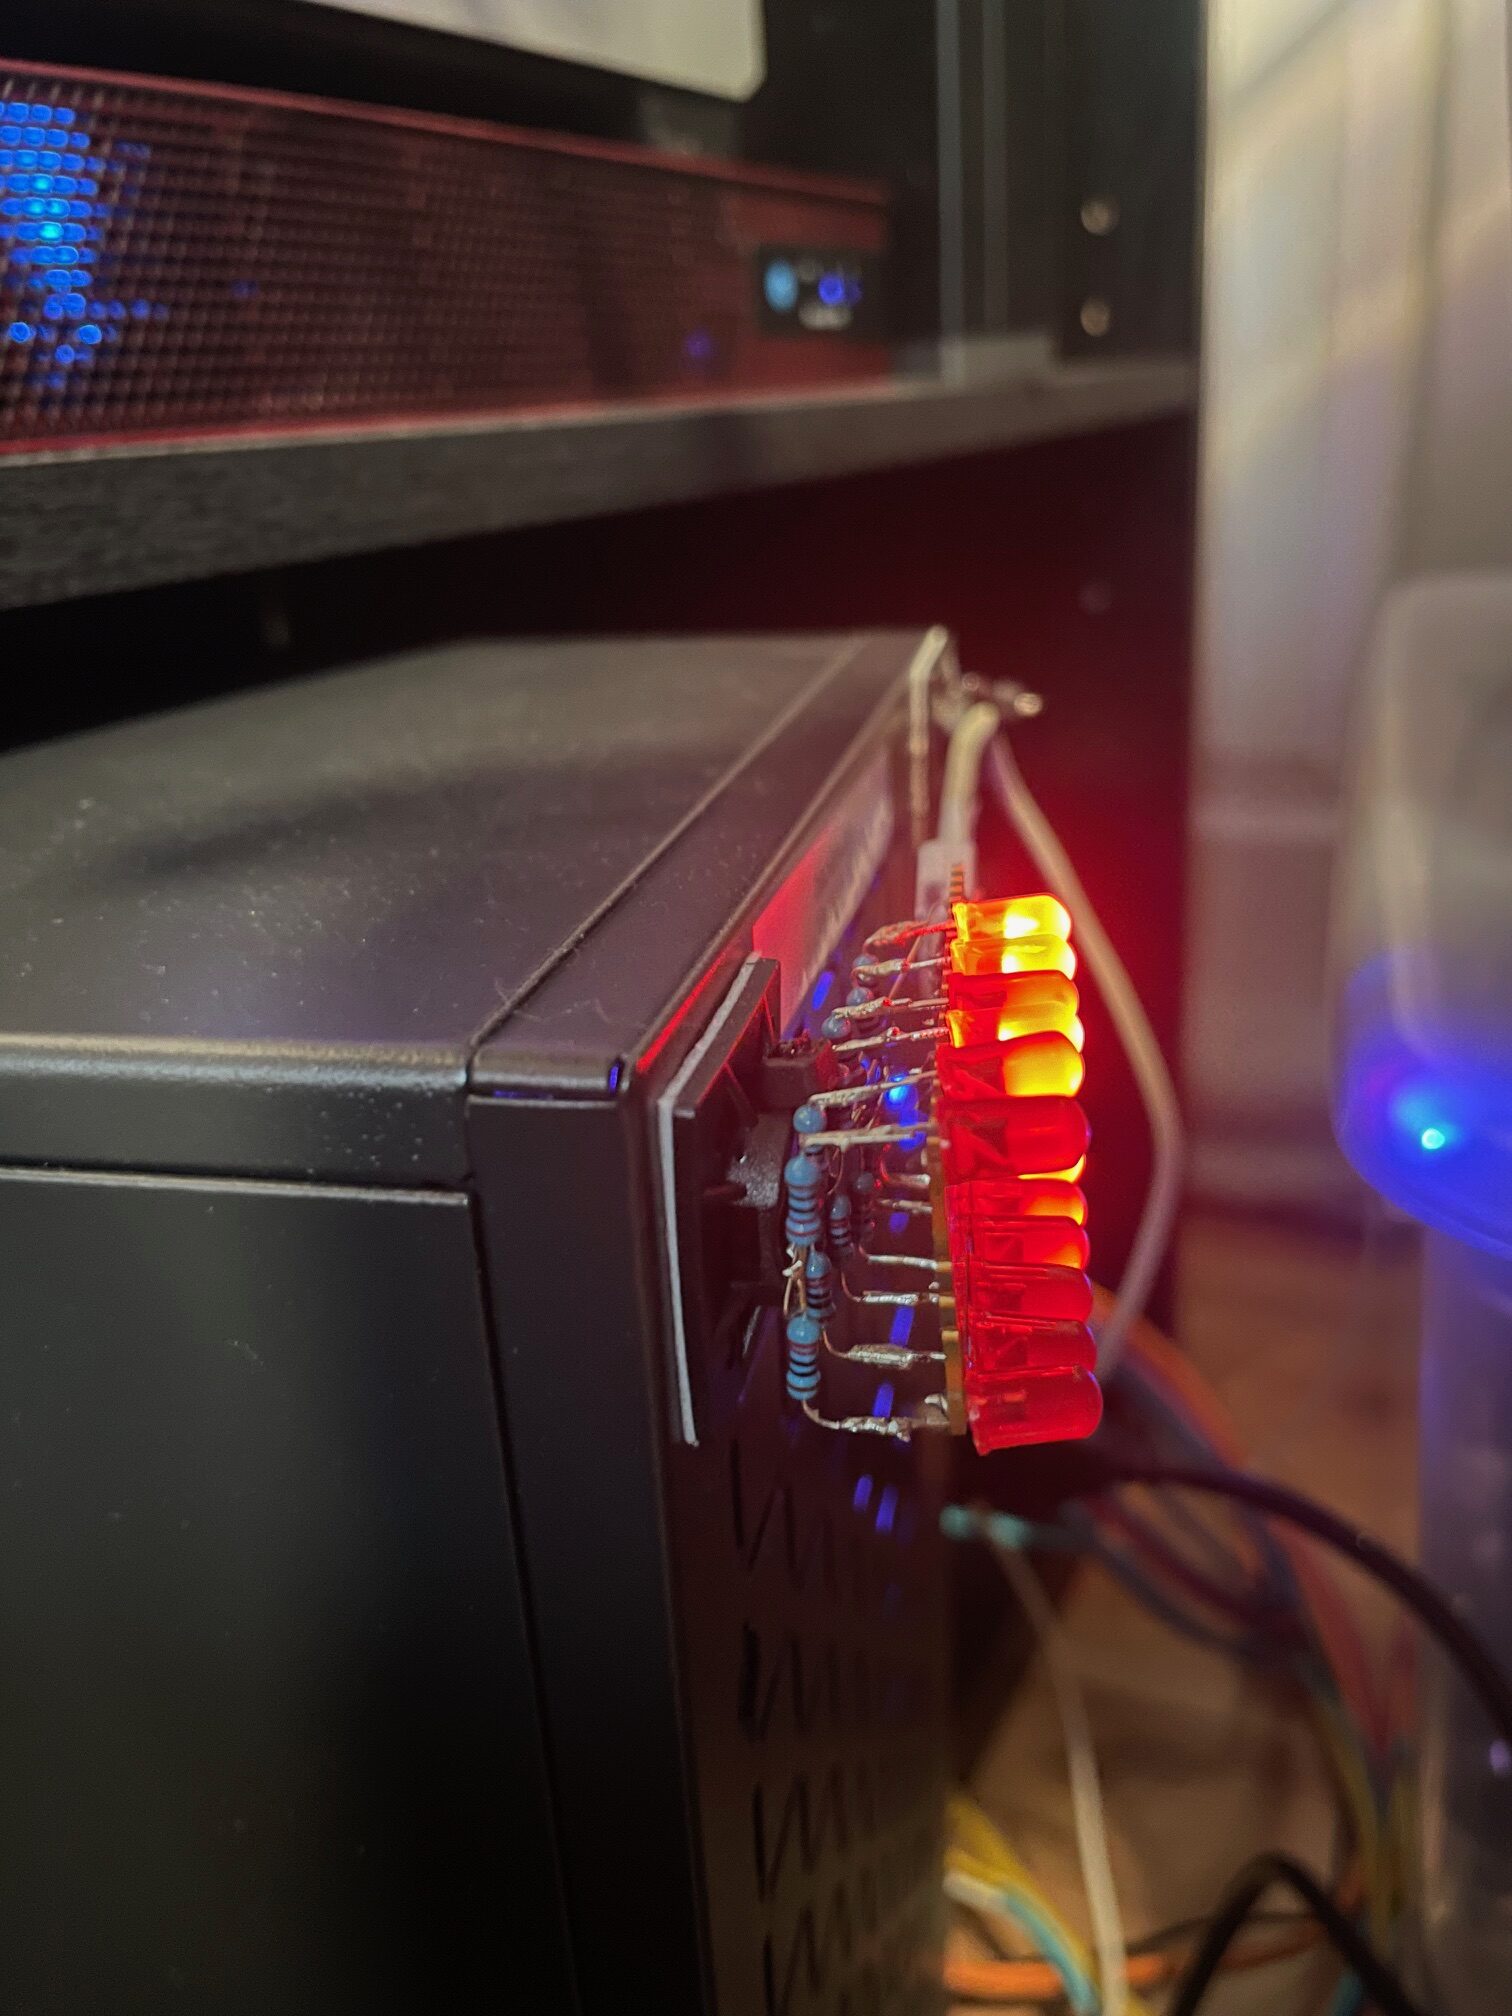
Raspberry Pi 5 PCIe Gen 3 Follow-Up

Good News,

Perhaps you’ve read my last article related to the Raspberry Pi 5, where I explore what kind of NVMe SSD experience one can get for a mere $25 or less spent on Amazon. And, the TLDR is that for under $25 I was able to purchase a brand new PCI-E M.2 HAT for the Pi 5, as well as a name brand Gen 3 128 GB SSD. The SK Hynix SSD was not brand new, it was pulled from something but SMART showed that it had less than 300GB written to it, so IMO absolutely worth buying.

So in that write up, I discuss the PCI link speed situation… basically, the Pi is only certified for Gen 2… but Gen 3 offers nearly double the speed! Immediately, I was conflicted. Even at Gen 2 speed, this already beats using SD card storage by a MILE. Way more reliable, MUCH faster, and much larger. There is no down side, other than costing a small bit more. Since this runs my server, I could have happily stuck with Gen 2 and still gotten more than my money’s worth in terms of bang-for-buck computing goodness out of the upgrade. However, many folks on the net reported no issues whatsoever running at 3.0 link speed, so I figured I’d try it, run several benchmarks, use it for several days. If I saw even one error, minor or otherwise, Gen 3 would be officially off the table.

Now, I’d be willing to bet that what I did next was not entirely necessary. But basically, there are some files you can read back from a system directory in linux which will tell you if you’re having NVME errors. Non-volatile memory advanced error reporting, or NVMAER for short. I go into more detail in the original article.

I run many scripts via cron on this machine. The ease of scripting as a sysadmin’s tool is a large part of what makes *nix such an excellent platform for power users. So… I wrote up a script, which runs once per hour. It checks for any of three types of NVMAER errors; when it does this, it appends a time stamped line to a log file stating wether or not it found errors. If It does find any, it will say which kind of errors they were, and I’ll know WHEN they happened.

Now, I’m sure what I am doing here is entirely redundant. I’d be very surprised if the system logs don’t already store all this and more, but it doesn’t tax this system to run a small script once per hour, and it gave me more confidence that if anything wonky did happen at Gen 3 speed that I wouldn’t possibly miss it! The last thing I wanted was to have minor errors which weren’t obvious, then down the road I end up with corrupt files.

I figured I’d share that script, because it came out pretty clean. And, it is a really good example of how one can go about building the tool, which solves a given problem. The multiple error types which are possibly made it just interesting enough, in my opinion. AND, even if this may be entirely redundant, just the ease of use made it worth it for me. So maybe you’ll find it of use yourself if you’re also self-validating PCIE 3 speeds on your Pi 5 SSD.

#!/bin/bash

LOGFILE="/var/log/cronlog/nvmaer.log"   # Log file. You'll want to change this! The directory must already exist.

# Define color codes
GREEN='\033[0;32m'
YELLOW='\033[1;33m'
NC='\033[0m' # No Color

# Current date
DATE=$(date)
LOG_DATE=$(date +"%m/%d/%Y %H:%M")
echo "CHECK DATE: $DATE"

# Initialize variables
exit_code=0
log_entry=""

# Function to check errors
check_errors() {
    local error_type="$1"
    local file_path="$2"
    
    echo "Checking for $error_type errors..."
    
    # Capture the output of the command
    errors=$(awk '$2 != 0' "$file_path")
    
    # Check if errors is empty
    if [ -z "$errors" ]; then
        # No errors found
        echo -e "${GREEN}PASSED${NC}"
        log_entry+=" $error_type PASSED"
    else
        # Errors detected
        echo -e "${YELLOW}ERRORS DETECTED!${NC}"
        echo "$errors"
        log_entry+=" $error_type ERRORS DETECTED!"
        log_entry+=$'\n'"$errors"
        # Set the exit code to indicate problems
        exit_code=1
    fi
    echo "- - - - - - - - - - - - - - - - - - - -"
}

# Check for FATAL errors
check_errors "FATAL" "/sys/devices/platform/axi/1000110000.pcie/pci0000:00/0000:00:00.0/0000:01:00.0/aer_dev_fatal"

# Check for NONFATAL errors
check_errors "NONFATAL" "/sys/devices/platform/axi/1000110000.pcie/pci0000:00/0000:00:00.0/0000:01:00.0/aer_dev_nonfatal"

# Check for CORRECTABLE errors
check_errors "CORRECTABLE" "/sys/devices/platform/axi/1000110000.pcie/pci0000:00/0000:00:00.0/0000:01:00.0/aer_dev_correctable"

# Log results
if [ $exit_code -eq 0 ]; then
    # No errors detected
    echo -e "CHECK $LOG_DATE -- NO ERRORS, ${GREEN}[CHECK PASSED]${NC}" >> "$LOGFILE"
else
    # Errors detected
    echo "$log_entry" >> "$LOGFILE"
fi

# Exit with the appropriate exit code
exit $exit_code

Original article: https://lostgeek.net/pi5nvme

Trimming the fat from Raspberry Pi OS Lite

Some of you may know that I host this website on a Raspberry Pi 5. I use Raspberry Pi OS Lite, which is a minimal Debian-based operating system that is lean and minimal without excluding anything that would break any features of the Pi itself. I’ve got the 4 GB model, and I don’t think I’ve ever used more than 400-500 MB of RAM during normal server operation. So why slim it down even more? Well, more software equals a larger attack surface, more potential software bugs, and so on.

In a situation where I’m never using the built-in WiFi and Bluetooth radios, there’s no benefit in having their drivers loaded into the kernel. Having unused code running can only increase the likelihood of exploitation, unexpected behavior, bugs, or other unwanted results. These devices also consume power, albeit a small amount, and probably even less when they aren’t connected to a network or device.

Now, I’ve found the drivers on the Raspberry Pi to be pretty good. Honestly, I’ve never had an issue. But since I’m literally not using any wireless on this thing—it’s connected to my network switch with less than a foot of Cat6 Ethernet cable—why bother? If nothing else, you’ll free up a few megabytes of memory. Perhaps an even more tangible benefit is having fewer items cluttering your systemd services and process lists when you check with top or htop.

After removing the following, I saw my memory usage drop to just 125 MB initially. That’s 125 MB of memory used while running Debian 12, with my Apache2 HTTP/HTTPS server and Pi-hole DNS. That’s not bad—kind of impressive, actually!

  • Stopped & Disabled:
    • Audio (via config.txt)
    • avahi-daemon
    • bluetooth
    • ModemManager
    • NetworkManager
    • triggerhappy
    • wpa_supplicant

Most of these are self-explanatory. As for the less obvious names, avahi is sort of like Apple’s Bonjour service; it’s for mDNS/local device discovery. I knew I didn’t need it, but if you’re not sure, leave it alone. Triggerhappy is a hotkey daemon, which is an easy one to disable on my totally headless system. Audio can be disabled by commenting a line in /boot/firmware/config.txt:

dtparam=audio=off`

And since I was in there anyways, I also commented a couple other lines:

camera_auto_detect=1
display_auto_detect=1

ModemManager, Bluetooth, and wpa_supplicant can just be turned off if you don’t plan on using WiFi or Bluetooth.

sudo systemctl stop ModemManager
sudo systemctl disable ModemManager

Repeat the same two commands for the other daemons.

Now, I’m not making this a full tutorial, and there are two reasons for that. For starters, I’m feeling kind of lazy, and I don’t want to have to redo everything to make sure my directions are 100% correct.

If you want to get rid of NetworkManager too, you’ll want to set up networking manually first. In my case, I edited /etc/network/interfaces and added the following:

auto eth0
iface eth0 inet static
address 10.16.17.10/23
gateway 10.16.16.1
dns-search lan
dns-nameservers 10.16.16.1

If you’re not sure, just leave NetworkManager installed. In my case, I went with a static configuration because I didn’t want to have a daemon running for the DHCP client. If your subnet mask is 255.255.255.0, you would use /24.

But the other very real reason is: If you’re not confident yet in how to disable these things, you probably shouldn’t. Do a bit more research first anyways.

When making changes to your system, have an up-to-date backup because you never know when a change could leave you with a non-booting system. Also, when changing the networking system, it should go without saying that doing so can leave you locked out of a headless system. So only proceed if you have a means of getting back in to fix it should you mess up.

This is really more of a journal of my experience setting this up, for those with some experience to get ideas from. It isn’t meant as a tutorial by any means. I just wanted to share how I got my idle RAM usage down to 3%, with my services running.

PCI Express Solid State on the Pi 5 for under $25

Since February I’ve been running this website, among other things from a Raspberry Pi 5. The SD card did okay, I actually can’t complain too much and if I’m being honest here I have to say SD card storage has gotten a lot less flaky since the earlier days of the Raspberry Pi.  None the less, this is my server and I want it to be decently equipped. I think the Pi 5 is mildly over priced (depending on why you need one), and getting a Pi, high performance SD card, the active cooler, official power supply, a case… you’re into some money. Not to mention the stupid mini-hdmi to normal hdmi adapter.

If you’ve already got a Pi 5 though, or know you’ll be satisfied with one then here is how I added a 128 GB SK Hynix NVMe SSD for under $25. SSD & hat included.
Geekworm BoxSK Hynix
          BC711
Amazon has various PCI-e hats for the Pi 5. Prices are between $7 and $50. But from what I’ve seen, unless you’re getting a multi-device hat I would cap my budget under $30 or so, and I’ll tell you why that might be worth considering. Spoiler, I didn’t consider it. The priciest of hats allow the use of multiple M.2 devices, but you’re sharing that bandwidth so in most cases I don’t think it makes much sense. But, bear in mind other hardware than PCI storage exists like Ai accelerators, network adapters, anything you can think of pretty much.

In some of Jeff Gearling’s content covering these pcie hats, he mentions that not all of them come with an impedance matched ribbon cable. What  does that mean? Well, PCI express is a pretty high tech thing, and you can’t just pump data over a pair of rusty coat hangers. On PCBs you may have noticed sometimes there are traces which curl or squiggle in odd, seemingly pointless ways.

Well, not so pointless as a matter of fact, it all comes down to impedance, shielding from interference and other matters which effect signal integrity. If you plan on using a high end SSD then you may want to go with this special cable. There are two ways to do that: Buy the cable on its own. (They’re dirt cheap) Or if you don’t feel like sourcing one then you can find a hat which includes one. The cheap-o cables are usually white plastic ribbons, commonly with blue plastic at each end to keep the row of pads rigid for inserting in the female connector. The nicer, to-spec cable will be an amber, pcb looking color, or may be black. But if in doubt, do some research.

SSD
          in hat            So This was annoying though. This hat is sold as being 2230 / 2242 compatible… and it is. But they don’t give you the nut and screw for 2230 drives, the shorter position.

Luckily I had such hardware unused from another adapter card, an mSATA to SATA Hardware board.

So the Pi 5 is certified for PCI E gen 2. Running it faster seems at first glance to be asking for trouble. People have had good luck with it though, and it is easily enable with a single line in the Pi’s config.txt.

Well I tried it, cheap cable and all. The improvement isn’t insignificant, in fact on my Gen 3 SSD I saw substantial benefits from the increased bandwidth.

Lets see the numbers…

Graph:
          Performance Compared

As we can see, you’re not going to be getting the same performance on your Pi as you would in a regular PC — forced gen 3, or otherwise. This is because the Pi only has a single PCIe lane going to the expansion header. That’s okay though, and as you can see it still beats the pants off an SD card, or even most SATA drives. The SSD arrived a few days before the hat, so I put it in my desktop to ensure it was working and see what the SMART data said. The drive only had ever had 300 GB or thereabouts written to it and just 6 power on hours. Not bad for $16 bucks!

Now, to Gen 3 or not to Gen 3, that is the question…

This is my server after all. I take pride in having little to no down time, hence springing for the SSD in the first place. Reliability was more of a motivator for me than throughput, but both are attractive of course. Doing some testing and benchmarks with the Gen 3 config line in place, I have not yet noticed a single error. You can check for them by grepping “nvme” in dmesg, or by reading from /sys/devices/platform/axi/1000110000.pcie/pci0000:00/0000:00:00.0/0000:01:00.0/aer* and in my case nothing looked to be amiss.

So, the real comparison then given our choice of Gen 2 or 3. It isn’t as small of a gain as the first chart may have you be thinking it is.

Graph:
          Gen 2 vs Gen 3

    Yeah, that’s what I said. Damn, almost double. So I’m leaving it in Gen 3 mode and I’ll keep an eye on things. To do this upgrade I had fully mirrored this server anyways to my FreeBSD franken-server so that can be quickly set back in place if I need to tweak anything. Up till now, all down time has been planned… in other words, there hasn’t been any.   : )

Operating Systems available for the Raspberry Pi 5

My round-up of 16 different operating system options available for the new Pi 5.     –    May 24th, 2024

Raspberry Pi OS (Debian Bookworm) The Official Pi OS

Debian is no doubt one of the best Linux distributions available today. In fact, not many would argue if one were to say that it is the best. Raspberry Pi OS is the official operating system of the Raspberry Pi, and as such you know that it will support all the hardware correctly out of the box with no extra work required from the user. Works on ALL Raspberry Pi models. Available in 32 and 64 bit arm flavors, and you can get an image with a desktop environment included or opt for the “Lite” version at just under 500MB. As of this writing, all versions available for the Pi 5 are built on Debian 12 (bookworm) and use the 6.6 Linux kernel.

Ubuntu 24.04 LTS For Pi4 & Pi5

Ubuntu likely needs little introduction. Two builds are available for the Pi; Desktop and Server. The server image weighs in at a mere 1 GB, and desktop at 2.6 GB. 24 is an LTS release for Ubuntu, meaning five years of free security and maintenance updates, extendable to 10 years with Ubuntu Pro.

Armbian for the Pi 5

Armbian has been around awhile, and Linux on ARM is their jam. They offer builds of the Ubuntu Jammy variety, or you can go with something Debian Bookworm based. You can choose a 370 MB CLI minimal image,  or pick a GUI image with your choice of any of the popular desktops. Gnome, KDE, Cinnamon, XFCE and i3 each have their own release available.  At the time of writing this, they are shipping Kernel 6.6.23 in all of them. They’ve also got a few “dedicated applications” options, Home Assistant, OpenHab and Kali Linux.

Kali Linux for all Pis

Kali is a penetration testing oriented linux distribution. When I first heard of Kali the project at that time was named BackTrack. Before that, way back in 2004 it was actually called Whoopix (White Hat Knoppix). If you’re interested in pen-testing, hacking, or cyber security, check them out. Kali has images available for all Raspberry Pi models, including the new Rpi 5.

LibreElec for all Pis

LibreElec lets your instantly turn your Pi into a powerful media center which you can connect to any TV and start enjoying. It uses the Kodi media center (formerly XBMC). The latest build will work on Rasp Pi 2 and newer, but they have images of an old version still available if you happen to want to try it on your old Pi 1, or Pi Zero.

Batocera for Pi 4 & Pi 5
Recalbox for all Pis

Both Batocera and Recalbox are similar to RetroPie, if you’ve heard of that. Basically, they give you a nice easy to use full screen interface for playing retro console games. You can emulate pretty much any retro home console or home computer from the 80s and 90s. I recently helped my brother build a full-size arcade machine, and after initially going for a custom x86 debian install with RetroPie which took all night to compile from source, we ended up using RecalBox and he couldn’t have been happier with it.

Void Linux Pi 5 Support Added

From their website, “(Void is) not a fork! Void Linux is an independent distribution, developed entirely by volunteers. Unlike trillions of other existing distros, Void is not a modification of an existing distribution. Void’s package manager and build system have been written from scratch.” They don’t mention the Raspberry Pi specifically directly on their downloads page, which is why I have linked to a news post mentioning new Pi 5 support. I’d image it works on older Pis also, but may be suited to more advanced users.

OpenFyde Pi 4 & Pi 5

OpenFyde is the open-source version of FydeOS, based on Chromium OS.

Mx Linux (Rpi Respin) For Pi 4 & 5

“MX Linux is a cooperative venture between the antiX and MX Linux communities. It is a family of operating systems that are designed to combine elegant and efficient desktops with high stability and solid performance.” – mxlinux.org (Download Page)

Diet Pi For Any Pi (and other SBCs)

“DietPi is an extremely lightweight Debian OS, highly optimised for minimal CPU and RAM resource usage, ensuring your SBC always runs at its maximum potential.”

Lineage OS Unofficial Pi 4 & Pi 5 Build

“LineageOS, an open-source Android distribution, is available for several devices,
with more being continuously added thanks to the biggest, yet ever growing, Android open-source community. Join us and breathe new life in your device, be it old or new.”
The linked build is unofficial, but looks promising. Use at your own discretion.

OpenWRT Unofficial Pi 5 Build

OpenWRT is custom Linux based router firmware, for wifi routers and other embedded devices. You can also run it on Raspberry Pi boards and other SBCs. Linked above is an Unofficial Pi 5 build, with new commits just last week. I’ve also run OpenWRT on the Pi 3 and Pi 4 with excellent results – they actually can be great routers.  Their wifi isn’t very good for using as an AP, but it’ll get you by in a pinch. Using another wired NIC over PCIE or USB3 though, you can get good value out of using it as a wired router. See OpenWRT.org

Arch Linux Arm Unofficial Pi 5 Guide

“It is possible to get Arch Linux ARM up and running on a Raspberry Pi 5 by removing U-Boot and replacing the mainline kernel with a directly booting kernel from the Raspberry Pi foundation. Automatic updates will even work since the replacement kernel is available as an official Arch Linux ARM package.”

FreeBSD 14  Unofficially said to work on Pi 5

User bmcdonaldjr on the FreeBSD forum reports that 14.0 runs well for him:

“The UEFI for freebsd on RPI5 MUST be used (current version is 0.3)
A USB ethernet adapter MUST be used (UEFI currently lacks driver for the onboard.
One of two methods can be used for the storage device.
An image (RPI) written to a USB stick along with a blank micro SDHC /w UEFI files.
An image (RPI) written to a micro SDHC with the UEFI files.”

And of course, FreeBSD already works on older models of the Pi which you can simply download. Namely, 14.0 works on the Pi 3, Pi 4, and many other ARM SBCs: aarch64 images

Windows 11 Arm Installation Instructions (Pi 2, 3, 4 & 5)

I don’t really condone this, but I wanted to make the list as complete as possible… so well, here it is.


For regular PCs, see the Operating Systems I use. You can read more about desktop environments and window managers over on the Packages page.

© 2025 LostGeek.NET - All Rights Reserved. Powered by ClassicPress, NGINX, Debian GNU/Linux.