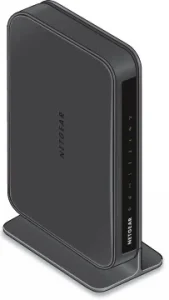
OpenWRT on the Dynalink DL-WRX36 WiFi 6 Router

Dynalink RouterRouter Box

The Dynalink DL-WRX36 Wireless Router

I purchased my unit from Amazon about 18 months ago. I never even tried the stock firmware — I bought this router specifically because of its solid OpenWRT support and excellent bang-for-the-buck features.

For around $80 (if I recall correctly) you get:

  • Qualcomm 2.2 GHz Quad-Core CPU (ARM64 / ARMv8)
  • 1 GB RAM, 256 MB Flash (for firmware/storage)
  • 2.5 Gbps WAN port, 4× 1 Gbps LAN switch ports
  • WiFi 2.4 / 5 GHz dual-band (4× internal antennas)
  • USB 3.0 port (for a USB HDD/SSD, FTP/Samba share, or cellular modem, etc.)

Rear ports

It’s a shame — I always intended to do a proper, in-depth review of this unit, along with a full guide on flashing OpenWRT. That said, the flashing process was painless and straightforward. If you’ve ever loaded DD-WRT onto an old Linksys back in the day, this is quite similar, though with a few extra steps.

I do recall some slightly ‘gray’ areas in the instructions on the OpenWRT Table of Hardware (TOH) page for the DL-WRX36, and I had made some notes. If I can dig them up, I’ll definitely update this post to include them. As I remember, nothing critical — just a couple of steps that were worded a little ambiguously. I highly recommend reading through the guide fully before starting, so you’re not left halfway through wondering what to do next.

Is it still available?
Amazon doesn’t have it in stock at the moment. Would I recommend it if it was? Absolutely. I’m very happy with mine.

Things to Note:

  • Unofficial builds exist that take advantage of hardware features on this router’s SoC. (The standard OpenWRT images don’t enable these by default — and for now, I’m sticking with the official builds. But performance is still excellent for my needs.)

For those curious, the IPQ807x SoC inside this router supports advanced hardware features like Qualcomm’s NSS (Network Subsystem) hardware acceleration, which dramatically improves routing throughput and reduces CPU load for tasks like NAT, firewalling, and VPN handling. While official OpenWRT builds don’t currently enable these proprietary modules, a few skilled community developers have published unofficial builds that do.

Personally, I run the latest stable firmware from the official OpenWRT release repository, and it’s been absolutely flawless for me. I get my full broadband speeds with headroom to spare — whether wired or over 5 GHz WiFi — and I’ve never felt limited by not having those additional offload features. This setup also ensures I have seamless access to the official OpenWRT package repository via Luci and UCI, with a stable, predictable system that updates cleanly.

That said, for the adventurous or performance-hungry tinkerers out there, those community builds with hardware offloading might be worth exploring. More details and links are listed below if you’d like to check them out.

Additionally — OpenWRT natively supports VLANs and VLAN tagging, letting you create isolated network segments, guest networks, or prioritize traffic on your LAN however you like. Combined with its firewall and routing flexibility, this makes OpenWRT an extremely versatile platform for both home and small business networks.

Performance

Since upgrading my desktop to an Intel AX210 WiFi card, I consistently get 1–3 ms pings to wired LAN machines — pretty respectable. Speeds are solid too, with ~500 Mbps transmit/receive over 5 GHz WiFi.

My configuration is simple:

  • One network for 2.4 GHz and another for 5 GHz, each with its own SSID.
  • I’ve heard of issues running both bands under a single SSID, so I avoided that.
  • IoT devices, mobile phones, TV boxes, etc. are on 2.4 GHz for better range and to keep them off the 5 GHz radio.
  • Desktops and laptops connect to 5 GHz for speed.

It works beautifully. No worries about being stuck on ancient 3.x kernels — OpenWRT keeps this thing current and reliable.

Why is OpenWRT the Cat’s Meow?

Luci, the web-based interface, is clean, solid, and well-organized. Every function accessible through the web GUI can also be executed via SSH on the command line.

If you’re a geek, you already get why this is awesome. But for everyone else: it makes quick changes a breeze — no digging through endless menus. You can configure it like a Cisco router via serial, telnet, SSH, or otherwise.

Other Perks

Packages. Tons of networking, telephony, and FOSS/Linux software packages are at your fingertips — one search away.

At the end of the day, every router is a computer of some sort. Unless it runs something exotic like VxWorks, chances are it’s powered by a Linux kernel. OpenWRT puts you in control. It’s your hardware — and you should run it your way. Suddenly that consumer-grade router feels like enterprise-grade gear.

Useful Links

Happy hacking!

CrystalDiskMark for Linux?? KDiskMark is here to satisfy!

Here is a bit of KDE software which I was not aware of. It was not included in Debian 11 (Bullseye) — you had to build it from source or use third-party packages… However it was officially packaged starting with Debian 12 (Bookworm) and newer.

Here it is, running it on Kubuntu 25.04:

KDiskMark 3.1.3 on Kubuntu 25.04

Excellent little tool for those who don’t want to benchmark disks in the terminal via dd / fio. Nothing wrong with healthy feature parity & easy of use!

XScreenSaver on MATE Desktop: Fixing Screen-Lock Key Bind

XScreenSaverThis is a follow-up to XScreenSaver Install Script for Debian MATE Desktop

Mate Lock Screen
Mate’s Lock Screen Shortcut — This already worked /w my script as-is.

To get working XScreenSaver lock via mate’s default keybind (MOD+L) simply do the following…

We’ll create a small wrapper script at /usr/local/bin/mate-screensaver-command:

sudo nano /usr/local/bin/mate-screensaver-command

Add the following:

#!/bin/bash
if [[ “$1” == “–lock” ]]; then
xscreensaver-command -lock
else
xscreensaver-command “$@”
fi

Then:

sudo chmod +x /usr/local/bin/mate-screensaver-command

Making htop Remember Your Custom Layout

htop screenshot
htop running with customized layout

I’d like to take a moment to explain a handy feature of htop, a system monitoring and process management tool — basically a text-based “Task Manager,” but far more powerful and flexible. I run it on my desktops, laptops, servers, and occasionally on virtual machines, whether in a graphical session or a terminal-only environment. Below, you’ll see it running on my server, where I’ve configured it to display the frequency of each CPU core, temperatures, total disk I/O, and total network I/O. As you can tell, activity is minimal — not much happening at this early hour, around 7 AM, when both local and internet traffic tend to be quiet.

htop is a brilliant little utility that punches way above its weight. It’s lightweight, packed with functionality, and refreshingly easy to use. Better yet, there are hardly any dependencies required, and it’s so cleanly written that even a novice should have little trouble building it from source, should they desire to do so. Remarkably portable, htop will compile on just about any Linux system, any of the BSD variants, macOS, Solaris and illumos derivatives, Haiku, and Cygwin (Windows). I think you get the point.

One handy but often overlooked feature is that htop can remember your custom display settings. Whether you prefer to see CPU frequencies, temperatures, disk I/O, or network traffic meters — you can tailor your view exactly how you like it.

Once you’ve customized your layout (press F2 in htop to access the Setup menu), simply press capital S (Shift + s) to save your settings. The next time you launch htop, it’ll load up your preferred view automatically.


Running XScreenSaver on a laptop? Let’s run cool…

For most people these days, screensavers have died off.

XScreenSaver Settings on Debian 12

I still like having them. And while most people have moved on from X.Org on Linux, well… here we are.

The 5300U in my ThinkPad has more than enough GPU power to display some beautiful screensavers. But by default, the system will ramp up into a higher performance state — because normally, that’s exactly what you’d want. Like if you were playing a game, or trying to load some bloated modern website.

But my idle laptop? I don’t want it getting all hot while it’s sitting on my lap or on the bed, just because it’s running a screensaver. So this is my little attempt to fix that — and it’s looking pretty promising.

The idea:

When XScreenSaver runs one of its screen hacks (screensavers), we’ll put the CPU into its lowest available frequency. That way, even when running hardware-accelerated 3D, the system will stay nice and cool.

Fortunately, the author of XScreenSaver — Jamie Zawinski — is a pretty smart dude, and the software already includes a clean little mechanism we can hook into to make this work.

Here’s how I’ve got it set up:

Create a script in your home folder, or wherever you want. xscreensaver_freq_watch.sh

#!/bin/bash

# Save current CPU and GPU max frequencies
CPU_MAX_BEFORE=$(cat /sys/devices/system/cpu/cpu0/cpufreq/scaling_max_freq)
GPU_MAX_BEFORE=$(cat /sys/class/drm/card0/gt_max_freq_mhz)

# Watch xscreensaver events
xscreensaver-command -watch | while read -r line
do
case “$line” in
LOCK*)
# Optional: do something on screen lock
;;
UNBLANK*)
echo “Screensaver stopped — restoring frequencies…”
echo $CPU_MAX_BEFORE | sudo tee /sys/devices/system/cpu/cpu*/cpufreq/scaling_max_freq > /dev/null
echo $GPU_MAX_BEFORE | sudo tee /sys/class/drm/card0/gt_max_freq_mhz > /dev/null
;;
BLANK*)
echo “Screensaver started — limiting frequencies…”
echo 500000 | sudo tee /sys/devices/system/cpu/cpu*/cpufreq/scaling_max_freq > /dev/null
echo 300 | sudo tee /sys/class/drm/card0/gt_max_freq_mhz > /dev/null
;;
esac
done

Of course, make it exactable with chmod +x. Also, use nopasswd in your /etc/sudoers line for your user.

Now because I’m using MATE / LightDM, I’m going to use a .desktop file. You could do something else, .xinitrc or a systemd service, but this is how I did it.

mkdir -p ~/.config/autostart
nano ~/.config/autostart/screensaver-watch.desktop

And inside that, we have the following

[Desktop Entry]
Type=Application
Exec=/home/ben/screensaver_freq_watch.sh
Hidden=false
NoDisplay=false
X-GNOME-Autostart-enabled=true
Name=Screensaver Frequency Watcher
Comment=Limits CPU and GPU frequencies while the screensaver is running

So far, it’s looking good! You may need to change this a bit depending on your configuration.

Installing Virt-Manager on Debian Without Backend Dependencies

VirtManager
I run several virtual machines on a home server, and this setup works out quite well for a couple of reasons. First, the VMs can run tasks at any time without slowing down the machine I’m actively working on. Second, Virt-Manager is a pretty slick solution—it gives you access to local LXC containers, QEMU virtual machines, or even lets you connect to VMs on another server over SSH.

If you’re just looking for the front-end functionality of Virt-Manager, you might find this interesting: you don’t need to install all the QEMU and libvirt daemon packages!

On Debian Bookworm, when I try to install Virt-Manager, it tells me it’s going to install 107 new packages, using about 220MB of disk space. Now, that’s not a ton of space, but it is quite a few packages. So let’s try a leaner approach:

sudo apt install virt-manager –no-install-recommends

That only pulls in 22 packages, using around 25MB of disk space.

For those who don’t know, the --no-install-recommends option in apt tells it to skip non-essential (recommended) packages when installing software. It still grabs everything needed to run the software, but skips the extras that apt thinks most people might want. Usually, that’s fine—Debian actually splits packages pretty aggressively (and sometimes annoyingly so).

For example, you’ve probably noticed that nearly every package with development tools also has a separate -dev version. Or maybe you’ve seen how xscreensaver is split into four separate packages, even though it’s distributed as a single application by its author.

Oh, and unless you’re exclusively using serial consoles through libvirt, you’ll probably want SPICE support working too! That means installing a couple more packages—just over 2MB extra:

sudo apt install libspice-client-gtk-3.0-5 gir1.2-spiceclientgtk-3.0

Let those install with their normal dependencies and recommended packages—otherwise the SPICE graphical interface won’t function correctly.

Anyway, remember that --no-install-recommends trick—it’ll definitely come in handy someday!

OpenBSD 7.7 Released Today!

OpenBSD 7.7
OpenBSD 7.7 — The 58th release from the OpenBSD project.

Happy to see that OpenBSD 7.7 is officially released! What’s new? More than I’ll even try to list here. Well… that’s a lie! I’ve got to mention some of it.

Personally, I was definitely pleased to see amongst the changes there are lots of kernel improvements. Many SMP enhancments, New AMDGPU hardware supported, as-well as Intel Arrow Lake. Perhaps post exciting is they’ve updated DRM to Linux 6.12.21. Also
acpipci now active on hypervisors, resolving longstanding  SeaBIOS/qemu issues

Highlights for the 7.7 Release include:

  • Enabled AP power state initialization fix for M1 MacBook on latest firmware.
  • Implemented support for ARM64 SVE (Scalable Vector Extension).
  • Added AMD SEV guest boot support on QEMU with EFI and SEV firmware management via psp(4).
  • Unlocked TCP output, timers, and accept(2) — significantly improving SMP scalability and parallelism for TCP workloads.
  • Updated Direct Rendering Manager (drm(4)) to Linux 6.12.21, with new hardware support for AMD Ryzen AI 300, Navi 48 GPUs, and Intel Arrow Lake.
  • Improved out-of-memory (OOM) handling and made page daemon operations more efficient.
  • Implemented per-CPU ringbuffers for dt(4) and extended btrace(8) with additional units and multiline script support.
  • Introduced kern.audio.kbdcontrol sysctl(2) to optionally treat multimedia keyboard volume keys as regular keys.
  • Allowed sysctl(8) to apply settings from a file in one command with -f, simplifying rc(8) startup.
  • Enabled shared netlocks for TCP send/recv system calls — improving multi-threaded network performance.

https://www.openbsd.org/77.html

I disable zram every time I install Fedora

ZRam
If you do a quick search online, you’ll find plenty of discussions where people ask about turning off zram—for one reason or another. They’re often met with a barrage of comments saying they’re making things worse. “Zram is free performance, didn’t you know? It costs nothing and doubles your RAM!”

Yeah, well—hear me out.

My desktop has 16 GB of RAM. I don’t even get close to running out of memory unless it’s been up for 30 days straight with 100 different apps or browser tabs open. My newer ThinkPad has 8 GB.

Now, 8 GB isn’t considered a large amount of memory anymore. In fact, people will tell you it’s rapidly becoming the bare minimum. But I’ll tell you this: for most people’s needs, especially on a laptop, it’s plenty. I don’t tend to have much open on my notebook—just a couple of browser windows, a few terminals, email, maybe a file manager. Any more than that and I start feeling lazy, because odds are I’m not really using all that stuff. I tend to be more focused when I close down things I’m not actively using.

Anyway, back on topic—why don’t I use zram?

My machines are all 8 years old, or older. They work just fine, but they are not new.

My desktop has a 4th-gen Intel chip, and my laptop runs a 5th-gen low-voltage i5. Zram does give you “more memory,” but it comes at a cost. It works by compressing unused memory pages, which means your CPU has to do that work. Every time a page is written to zram or read back out, it must be compressed or decompressed.

Whether or not that impact is that noticeable, I can’t say for sure—I haven’t run benchmarks. But I do know this: my machines are fast enough, and I like to keep them light, fast, and nimble. And since I already have enough RAM, it makes no sense for me to use zram. If I do need to swap, all of my systems have fast SSDs to handle swapping well enough. I typically allocate 1–4 GB of swap space, and I do that on the fastest SSD in the system.

If you’ve got multiple drives—say, NVMe, SATA SSD, and a spinning hard drive—only put your swap on the NVMe. Another tip: if you’re not planning to hibernate, there’s no reason to make your swap as large as your RAM. Swap is useful as a safety net so your system doesn’t lock up when you run out of memory, but in my experience, I’ve rarely used more than 1 GB. If you’re consistently using multiple gigabytes of swap, you probably just need more RAM.

Another argument I often see is: “Zram doesn’t consume extra memory.” Well… how does that make any sense? Of course it does. Sure, it’s compressed—maybe you use 500 MB of RAM for what would’ve been 1 GB of swap—but I’d rather use that 500 MB as actual RAM and just let the system swap to SSD.

If you want to disable zram on Fedora, just create an empty config file called zram-generator.conf and place it in /etc/systemd/.

You can even do this from the live installer, while it’s still copying data. Just pop open a terminal and run:

sudo touch /mnt/sysroot/etc/systemd/zram-generator.conf


That’s it!

ben.lostgeek.net/code

MatrixTo keep things clean and organized

I’ve put most of the code I’ve shared here all up in one place. Everything has a .txt extension, so it can just be viewed in the browser, copied and pasted. There are some readme files, but they are minimal… and this is just a start; but a start is better than nothing.

Simple Paint program for Linux?

Ever miss the easy, simpler times?

Microsoft Paint
Microsoft Paint

TLDR; That screenshot isn’t of jspaint.app — but with the exception of trading the blue titlebar for your web browser’s UI; it is basically the same thing. I stumbled upon jspaint.app while looking for a basic, simple Linux\Unix paint program.

jspaint.app
All those familiar toolbar items, exactly as you remember them.

Genuinely useful, I would say. For when you need to just draw a circle, a dot, an arrow to draw attention to part of a screenshot. When you need to do a simple resize, rotate, crop. And of course, it can save and open files from your local machine. The uploading and downloading is mimicked through the win32 inspired dialog, it even plays a Win 9x error warning chime to remind you to save upon quitting! And I’ll be damned, I wrote this whole thing up not knowing that there is much much more, if you Exit the “program” instead of just closing the tab. Some very cool stuff. Definitely will scratch the nostalgia itch, but genuinely useful too.

Anyways, that was the main point of this; sharing something I thought was pretty cool and unique. Despite being a copy of something, I’d imagine it is a complete re-implementation, and probably took some serious programming chops to pull off so cleanly. As far as I can see, it has full feature parity with the mspaint in Windows 95 – XP. (in my opinion, the best version.)

But, my search continued. I want something installed on the system, I’m not into web apps — but I made an exception to share that. It’s pretty darn neat. Both Krita and GIMP are fantastic image editing applications, but they’re packed to the gills with features. Most of the time, yes that is a great thing. But sometimes, it simple isn’t needed. Both applications take at least 5 – 10 seconds to start up, and if you haven’t worked in them in a while it can feel a bit cumbersome finding your way through whatever edits you’re trying to make as you re learn the interface and layout. I’m a casual user. If I the software daily, I’d have no complaints.

In my 5 minute search to see what was out there I found a few things of interest…

Pinta looked like a great option. However, you need to install Microsoft’s .NET SDK in order to compile it yourself. It isn’t already in the debian repositories of course either. They did have a tarball of it, I’ll probably go back and try that… but I ended up moving in. Yes, they had flatpacks and snaps, I’m all set since I have no other software in the format thus far and ehh, I just prefer more minimalist solutions.

I ended up installing Dibuja; had to of course do some terminal funkery but wasn’t too bad. Basically there was a dependency issue with libgdk-pixbuf, I installed the current replacement but apt wasn’t happy with that… However it was an easy fix, equivs came to the rescue.

First off, we install the updated library libgdk-pixbuf-2.0-0. Go ahead and try just installing the .deb for Dibuja because my issues may have been because I’m running on trixie… I doubt it though, but not sure. If you have dpkg complain that you’re missing libgdk-pixbuf, continue on to install equivs.

For those in the same pickle as I was:

mkdir ~/equivs-dibuja
cd ~/equivs-dibuja
equivs-control control

Open control in an editor and add the following:

Package: libgdk-pixbuf2.0-0
Version: 2.22.0
Provides: libgdk-pixbuf2.0-0
Description: Fake package to satisfy dibuja

Then run equivs-build control. Install by running sudo dpkg -i libgdk-pixbuf2.0-0_2.22.0_all.deb

Now… we try installing Dibuja again…

Dibuja
At last, Dibuja runs.

As you can see, quite simple. No layers, unicorn shaped brush tips, flatsnaps, just a good BASIC image editor.

© 2025 LostGeek.NET - All Rights Reserved. Powered by ClassicPress, NGINX, Debian GNU/Linux.