Installing Desktop Environments on FreeBSD – Handbook Chapter 8
NetBSD Performance and Power Management Tweaks – Post on unitedbsd.com
Useful resources for geeks using GNU/Linux:
UC Berkley Open Computing Facility Mirror – I can get 300 Mib/sec down!
Definitely a great place to download both BSD and Linux from. They mirror many popular projects. HTTPHTTPS
The Debian Administrator’s Handbook – Very well organized HTML book
Building a Debian Kernel Package – Easier than you may think Debian Wiki Detailed rundown of Linux’s init systems (sysv, systemd) a bit outdated but quite comprehensive yolinux.com Init Tutorial
The T2 System Development Environment – aims to support all CPU architectures, including maintaining or bringing back architectures which have been dropped in the mainline kernel. Intel Itanium support as well as fixing drivers and other things which didn’t need to be broken or removed simply because they were “old”.
Visit t2sde.org. The developer documents much of his progress in a series of videos.
Useful resources for hardware hacking & modifications:
OpenWRT Project Table of Hardware – List of devices supported by OpenWRT The OpenWRT project is a completely free and open source linux system intended to replace the firmware on your router / wireless AP. It has tons of packages available and has a very active community and development scene. I’ve used it for years, it is incredibly good firmware. If you’ve never heard of it think DD-WRT but better, in my opinion.
Parkytowers.me.uk has a website dedicated to re-purposing “thin client” PCs into general purpose PCs, Linux boxes, servers, etc. This guy has written up information on HUNDREDS of these things, and details hardware and software hacks to get more functionality out of them. Check it out! https://www.parkytowers.me.uk/thin/
(you click the DETAILS link and get to a page with all the OEMs down the left side)
by connecting it to the slim optical drive’s narrower SATA connector
Quick and dirty hack to expand your storage. I wouldn’t do this to an expensive laptop you just bought, but on many laptops the SATA connector PCB is separate from the motherboard. That is the case with this one, both the HDD and ODD (optical disc drive) connectors are on small PCBs connected via ribbon cable. If you screw up, replace it… That said, check to verify you can get your hands on a new one first — if you care. And if you want a prettier or more, plug and play solution then do a web search for “slim DVD to hard drive adapter”. You can buy something more elegant for under ten dollars. I did this because I could. It cost nothing. There was no risk, this is a motherboard I use as a server, so I don’t use an optical drive anyway. Some bulk storage though, without sacrificing the IOPS of the 256 GB SSD though… that’d be cool.
So, with the modification being done here you can really use just about any SATA drive. However, unless you find a source of 12V somewhere on the laptop motherboard or come up with it somehow then you’ll probably want to avoid 3.5″ desktop size drives. Notebook HDDs and any SSD will happily run on 5 volts, as far as I know. That said, we need to get a bit creative though, because while the stock ODD connector does have power it only has 3.3 volts. That’s it, 3.3V some control pins and ground.
Notice the totally different spacing?
A full size SATA power connector shown, above our slim optical drive connector. You can see I already cut into it, leaving it open-ended. Check out the picture above. Take a real good look… See, I was thinking I’d cut the end off the power connector, and BAM! Instant expansion. This is here below illustrates what NOT to do: Why wouldn’t that work?? Well, look back to the second to last image — the one with the two connectors. The desktop / full size power connector uses wider spacing between the pins. So while as you can see I did physically plug this into a hard drive, the pins do not each land correctly one to one on a pad. Even if they did, the pins in the power portion of the slim ODD connector only have ground and 3.3v. For notebook drives we need 5v. For fullsize drives, we need 5v and 12v.
First things first, this connector like most PCB mounted connectors has anchor points at opposite ends. These add mechanical strength and are soldered down to the PCB so that repeated plugging and unplugging of the connector doesn’t break the solder joints to the fragile data and power pins. To do this mod, we have to remove the power portion of the slim ODD connector. In doing so we loose half our mechanical reinforcement. So at a minimum I’d recommend either putting a generous amount of hot glue behind the data portion of the connector (which we do not want to disturb). Epoxy would be better.
Flush cutters I have found to work well for this purpose. Take your time, see how the material chips while cutting. When you’re close, switch to a file or sanding block — much better chance of not screwing up and going too far.
Part way done. I’ve stood up all the power pins, to carefully remove them without tearing PCB traces or damaging the pads. The pins were wiggled back and fourth, and fell right off.
Above is the result of much patient clipping, and even more patient filing. Here it isn’t totally done, but 99% there.
Not too shabby, provided you get gratification out of making your technology do things it was never intended to do. I’ve always loved hacking and modding, and for a simple home server application I’m fine with something like this. Important thing here is that the SATA data connector and lines are still the way they were from the factory. All we’re doing here is accommodating power for something other than a slim DVD burner. I took a lazy route and just sliced up an old USB cable. This works for 2.5″ drives, but won’t work for full size desktop drives. There are certainly other places on a laptop motherboard to get 5 volts from. This laptop has two USB ports on board. There is also a third if used with another small PCB / ribbon. USB can supply 5 volts, and we don’t need to do anything crazy to get it. Many USB HDDs are entirely USB powered so I know that it can deliver enough for this drive as well.
And there it is in action! A passively cooled Pentium N5000 quad core, 8 GB of DDR4. 256 GB WD Blue SATA M.2 solid state boot drive, and now a 500 GB WD Blue SATA spinning disk for bulk storage and backups. I have the battery connected here as-well. It can run this board quite a while without a screen especially. This lets me feel a little more confident experimenting with things like write-back cache.


 The OpenWRT project is a completely free and open source linux system intended to replace the firmware on your router / wireless AP. It has tons of packages available and has a very active community and development scene. I’ve used it for years, it is incredibly good firmware. If you’ve never heard of it think DD-WRT but better, in my opinion.
 laptop you just bought, but on many laptops the SATA connector PCB is separate from the motherboard. That is the case with this one, both the HDD and ODD (optical disc drive) connectors are on small PCBs connected via ribbon cable. If you screw up, replace it… That said, check to verify you can get your hands on a new one first — if you care. And if you want a prettier or more, plug and play solution then do a web search for “slim DVD to hard drive adapter”. You can buy something more elegant for under ten dollars. I did this because I could. It cost nothing. There was no risk, this is a motherboard I use as a server, so I don’t use an optical drive anyway. Some bulk storage though, without sacrificing the IOPS of the 256 GB SSD though… that’d be cool.
 So, with the modification being done here you can really use just about any SATA drive. However, unless you find a source of 12V somewhere on the laptop motherboard or come up with it somehow then you’ll probably want to avoid 3.5″ desktop size drives. Notebook HDDs and any SSD will happily run on 5 volts, as far as I know. That said, we need to get a bit creative though, because while the stock ODD connector does have power it only has 3.3 volts. That’s it, 3.3V some control pins and ground.
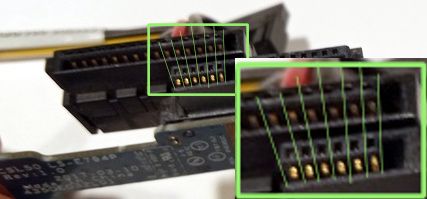
 Why wouldn’t that work?? Well, look back to the second to last image — the one with the two connectors. The desktop / full size power connector uses wider spacing between the pins. So while as you can see I did physically plug this into a hard drive, the pins do not each land correctly one to one on a pad. Even if they did, the pins in the power portion of the slim ODD connector only have ground and 3.3v. For notebook drives we need 5v. For fullsize drives, we need 5v and 12v.
 Part way done. I’ve stood up all the power pins, to carefully remove them without tearing PCB traces or damaging the pads. The pins were wiggled back and fourth, and fell right off.


